In the late winter and early spring, one of our most important tasks is seed starting. When we first started gardening, we would buy sprouted plants from the hardware store but after a year or so (way back in the day) we decided to try our hand at starting our vegetables and flowers from seeds. Now, this is an annual event that the whole family participates in. I think the most magical part of the whole experience is that from a very young age, my children are equipped with the knowledge on how to grow their own food.
This post may contain affiliate links. This means that I may earn a small commission at no extra cost to you.
Why You Should Garden with Kids
Gardening with kids is a crucial life skill, even when they are infants. There are so many benefits of including your kids in this hobby and lifeskill. One of the most important is their immune system! Just by letting your kids get in the dirt, you are allowing their immune system to strengthen. Gardening sparks natural curiosity and wonder within kids and presents them with tactile and sensory experiences. Gardening also helps children to self-regulate, work independently, and it teaches them about patience and delayed gratification. Most importantly, gardening with kids teaches your children how to be self-sustainable.
I have found that parents tend to leave their children out of gardening because it makes a mess or slows them down. While those are valid points, this is an area that I encourage you to embrace. Sometimes we need to slow down and messes can always be cleaned. So take a step back, teach an important life skill, and get your kids involved.
Perks of Growing Your Own Food
Along with having gardening as a hobby, growing our own vegetables, herbs, and flowers allows us to provide ourselves with food. We eat them straight from the garden. Then, whatever we have in excess we can freeze, dehydrate, or preserve. As our garden has grown over the years, we also have made a huge effort to grow enough specifically to preserve. Jellies and pickles are my favorites to preserve but there are so many more – and preserving is not hard at all.
Why You Should Start Seeds Indoors
When we start our seeds, we start them in late winter/early spring, but that can vary upon what planting zone you are located in. Your planting zone will tell you what zone you are in and when your last frost is. On the back of the seed packet, you will find when you should plant it – sometimes it will give you specific months, other times it will tell you how many weeks before the last frost you should plant them. By starting our seeds early indoors, we are able to start our garden earlier in the season.
Simple Seed Starting
When you are starting out, it is okay to keep it simple. Gardening is a lot of work – whether you are doing it on a small scale or large. This statement is not to deter you from going big but keep in mind, after starting all of these plants, you will need to (possibly) repot them all, then transplant them into the garden, then you will have to tend to them all outside – watering, removing bugs, fixing disease, etc. It is 100% possible but when you are just starting off, it’s okay to keep it simple. Starting with tomatoes, peppers, marigolds, and zinnias is a great option for beginners. Some seeds are fussier, these tend to start incredibly easily.
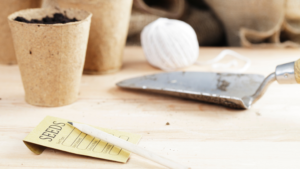
Seed Starting Equipment
When you start seeds indoors, there are a few pieces of equipment that you will want to have on hand.
With these items, you will be able to help your seeds get the perfect climate to germinate. Some people are able to forgo the grow lights and heat mat if they have an area that stays extremely warm and gets adequate lighting. We choose to go this route because it is an extra measure of success.

Choosing Seeds
When you choose your seeds, there are a couple of things to know. If you are planting a non-heirloom seed, your seeds are most likely GMO. This means that they have been modified to be more resistant to disease and the environment. If you choose to harvest these seeds, you also will find that there will be a small success rate at harvesting the seeds and having them germinate. If you go with an heirloom variety, which is what we use, you will have a non-modified seed. These can get diseases easier but with the proper care, you will not have issues. These seeds have high success rates with germination and you can also harvest the seeds from the crop, store them, and use them for the next year. We buy most of our seeds from Baker Creek Seeds, a family owned business in Missouri. They have a wonderful variety of seeds, great support, and they even have exotic seeds you can buy.
Each seed is going to have specific instructions on how to plant. When you are starting your own seeds, the goal is to have the plant ready to go outside when the weather is favorable. You will look at the back of the seed to see when you should start them inside. You will find that some seeds will do best starting directly sown outdoors. Common ones of that are beans and squash. There are also flowers that will do best starting outside – they will be labeled accordingly.
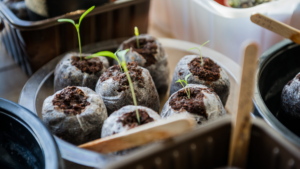
Seed Trays
When you start your seeds, you will want a container that is a couple inches high with drainage holes. I prefer to buy a couple seed starting trays and reuse them every year. You can also see how I make seed starting pods out of our recycled toilet paper rolls. But you will be able to start seeds in any container as long as it is a few inches high with drainage holes. If your plants get too big, you will need to repot them in a bigger container (we have used solo cups and old yogurt cups with drainage holes put in them before).
Seed Starting Soil
When you get your soil for your plants to start in, you will want one specifically for starting seeds. When you use soil from your garden or reuse soil from your potted plants, you are risking disease and sometimes the soil is not light enough for the seed to break through. I use Seed Starting Mix and the Seed Starting Brick. We have had great luck with these items.
Seed Starting Setup
You will fill your containers with soil and then dampen it. I have seen some people pre dampen the soil and then put it in but what I have found effective is filling the pods first and either putting water in the tray below and letting them absorb the water from the bottom up or heavily spraying each pod with water in a spray bottle. Once the soil is damp, tap it down to remove any gaps. If more soil is needed, just top it off and spray dampen again.
Planting Your Seeds
Now that your healthy seed starting soil is in there, you will get your seed packet and see how deep you are supposed to plant them. Some will just have you sprinkle on the top whereas some will have you bury them a bit. I typically plant two seeds per cell – this allows for one to not germinate and if they both come up, once their root system is more mature, I can separate them and put them in separate pods. If you are burying your seeds, make a divot of the appropriate depth, drop the seeds in, and cover them lightly with soil.
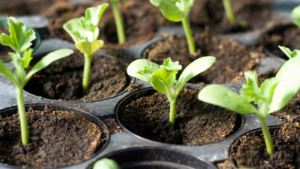
Light, Water, Heat, Repeat
Now you get to nurture them. You will water the seeds with a mister or spray bottle, getting the soil damp but not soggy. It is okay to let the soil dry a little in between. I keep the lid on my trays between watering while I wait for my seeds to germinate. This keeps them safe from spills and creates a moist environment to promote germination. Keep your seeds in a well-ventilated area. When they get bigger, the airflow will help prevent disease. If your area doesn’t have much airflow, just add a fan and put it on a low setting. You will also have your grow lights on as well. I have mine set to a 12 hours timer – these are the ones that we use and have a built-in timer on them. You can also just use a plug-in time to control when your lights are on and off. Through this time, the heat mat is on consistently, providing optimal soil temperature for the plants.
Our grow lights are set up on hanging chains so we can adjust the height of them. When they are germinating and are little bitty, we have the grow lights almost directly on top of them and as the plants get bigger, we shorten the chain so the lights are higher above them. You can also put books under your plants and remove them as you go if you do not want to adjust the lights.
Hardening Your Seedlings
When the last frost is nearing, you will want to start gradually moving your plants outside. If you move them straight outside, they can go into shock. About a week before you plan to put the seedlings into the garden, put them in a protected spot that is partly shaded and out of the wind for a couple hours. Then you can bring them back in at night. Over the next week to week and a half, you’ll repeat this and give them a little more time outside each time. This is a process called hardening and it strengthens the plant. If you have a cold house, you can also put them in that.
Then the fun starts! You can transplant them into your garden and watch them grow. I highly encourage you to let your kids be a part of this process. They are great helpers and love being included. I use the experience as a part of our homeschool curriculum as well – these are crucial life skills for them!
Be sure to follow me on Instagram for more tips, tricks, and resources on homesteading, homeschooling, and parenting outdoors.


Hardening plants is something I wish I knew last year. Definitely going to do it this year. I didn’t know you were supposed to water seeds with a spray bottle. I gues that’s another mistake I made. Thanks for writing this!
The water bottle helps to not disturb the soil in those early days but truly, there are SO MANY methods. You just find what works for you and roll with it. The beauty of gardening is its always growing, and so is you knowledge and techniques.